miércoles, 28 de marzo de 2012

Bread Baking Babes - Hamburger Buns

Good grief!  Can you believe it's already July 16th?  Not only does that mean that July is already more than half over (sob) but that also means it's time for the Bread o' the Month from the Bread Baking Babes.  And guess who got to choose the bread this time around?  Moi!


I chose Hamburger Buns from a recipe card I picked up in Williams Sonoma.

The recipe gives instructions for regular sized buns as well as sliders (aka the most adorable things ever).


Homemade Hamburger Buns
Williams-Sonoma
1 1/2 cups (375 ml) milk
8 Tbs (1stick/125 g) unsalted butter, cut into 8 pieces
4 1/2 tsp active dry yeast
4 cups (625 g) all purpose flour, plus more for dusting
5 Tbs sugar
1 Tbs kosher salt
1 egg beaten with 1 tsp water
sesame seeds for sprinkling (optional)
In a small saucepan over medium heat, combine the milk and butter and heat until the butter is melted, about 7 minutes.  Remove from the heat and let cool to 105-155'F (40 to 46'C).  Add the yeast and stir until the yeast is dissolved.  Let stand for 10 minutes.

In the bowl of a stand mixer fitted with the dough hook, combine the 4 cups of flour, the sugar and salt and beat on low speed until combined, about 30 seconds.  Add the milk mixture and knead until the dough forms a ball, about 1 minute.  Increase the speed to medium low and knead until the dough is smooth and elastic, 4 to 5 minutes.  Remove the dough from the bowl, oil the inside of the bowl and return the dough to the bowl.  Cover tightly with plastic wrap and let the dough rise in a warm place until doubled in volume, about 1 hour.

Line a baking sheet with parchment paper.  On a lightly floured work surface, roll out the dough into a 10 by 7 1/2 inch (25 by 19 cm) rectangle.  Using a ruler as a guide, cut the dough into 2 1/2 inch (6cm) squares.  Transfer to the prepared baking sheet, spacing the buns evenly apart, and cover tightly with plastic wrap.  Let rise in a warm place for 30 minutes.  


Preheat oven to 400'F (200'C)


Remove the plastic wrap from the baking sheet.  Brush the tops of the buns with the egg mixture (I brushed the tops with milk) and sprinkle with sesame seeds if using.  Bake until the buns and golder and an instant read thermometer inserted into the center of a bun registers 190'F (88'C), 14 to 16 minutes.  Transfer the buns to a wire rack and let cool completely.  Cut in half and use as hamburger buns.  Makes 12 hamburger buns.


For slider buns: Follow the instructions above but roll out the dough into a 9 inch (23 cm) square.  Cut into 1 1/2 inch (4cm) squares and place on 2 parchment lined baking sheets.  Cover tightly with plastic wrap and let rise in a warm place for 30 minutes.  Position one rack in the upper third of an over and one rack in the lower third and preheat to 400'F (200'C).  Brush the tops with the egg mixture and sprinkle with sesame seeds if using.  Bake for about 14 minutes, rotating the baking sheets from top to bottom and 180 degrees halfway through baking.  Makes 36 slider buns.

Time got away from me once again and I didn't have time to try to make slider buns before it was time to post.  But I hope to soon and will show off my results.

Please visit the participating Babes listed over on the left.  I've seen some preview pictures from some of them and they've got some amazing buns (hee!)

 If you'd like to be a Buddy,  please make the bread and post about it by July 29th.  Send mt a link at iliketocook AT shaw DOT ca.

Sorry I've been so absent and things are kind of not interesting around here.  I'm working hard on getting myself out of this funk.  Keep your fingers crossed for me please.

Peace!

sábado, 24 de marzo de 2012

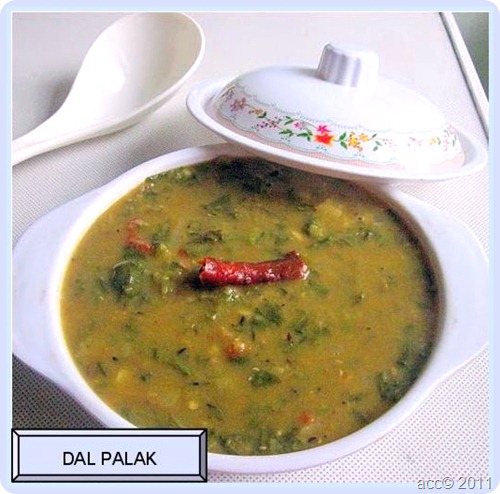
DAL PALAK

I tried this recipe from Mrs. Mallika badrinath's kurma book. It's a nice combination for roti.I made slight changes in the actual recipe according to our taste buds.I googled so many recipes before trying this one but i found most of the recipes used toor dal / moong dal . I used masoor dal as mentioned in the cookbook.Check out the amazing health benefits of masoor dal in kitchen clinic section. U'll surely try this recipe Winking smile.

dal palak

INGREDIENTS

  • Masoor dal – 1/4 cup
  • Palak / Pasalai keerai – 2 bunches  (hope u all the know the size we get in india) (roughly 2-3 cups after chopping)
  • Turmeric powder – 1/4 tsp
  • Salt and water – As needed,

To grind

  • Green chilly – 2 –3 nos
  • Ginger – 1 inch piece

To temper

  • Cinnamon – 1 small piece
  • Cloves – 2 nos
  • Methi seeds – 1/4 tsp
  • Jeera – 1/2 tsp
  • Red chilly – 1 no (pinched into two)
  • Garlic cloves – 5 nos (chopped finely)
  • Big onion – 1 no (chopped)
  • Tomato – 2 nos (-do-)
  • Curry leaves – a few

METHOD

  • Pressure cook masoor dal and palak with turmeric powder for 2 –3 whistles. The dal should be mushy.
  • Grind the ingredients given under "grind" to make a smooth paste by adding required water.
  • Now heat a kadai and temper all the items given above in the same order.
  • Add onions and tomatoes and saute till tomato turns mushy.
  • Add the ground masala and saute well for few mins.
  • Then add the cooked masoor dal & palak mixture and add the required water .
  • Allow it to boil well for few minutes.

Serve with roti.!!

Note: If u want to serve this for rice , just omit the cinnamon & cloves and try the same.

KITCHEN CLINIC

MASOOR DAL

Masoor daal is used in every household to make curries or sambar. It is a very common lentil and easily available as well. Masoor daal cooks very fast and does not need any kind of soaking before cooking it. Even tough people may treat it asa simple lentil; it has many properties which are good for health. People who are purevegetarians can eat this lentil everyday. They will get the same amount of strength that non-vegetarian people have.

Many times we see that people complain about having less blood in their body. Doctors recommend some medicines which will increase the blood and red blood cells in the body for such people. Instead of eating those medicines such a person can have curry made of masoor dal twice a week and they would never complain of less blood. This lentil is good as a remedy when a person is facing dysentery problems. Masoor daal is good for the excretory system and helps keeping it clean. It is good for people facing illnesses due to impure blood.

Masoor daal reduces the growth of cough in the lungs and helps reduce acidity as well. Soup made of this lentil is given to a patient suffering from fever. It will give strength to the body of the patient as well as keep the blood pure. People who have piles and bleed as lot during excretion should definitely have masoor daal. It will help reduce this problem.

Powder made from masoor dal should be used instead of soap for infants and children. This helps restore the moisture in the skin of children. It brings a glow to skin and prevents it from cracking in the winter season. It is used as a face pack when people have very oily skin. It reduces the oil produced from the skin and helps reduce acne and pimples. It also prevents itching of skin.

Our daily diet can include a bowl of lentil soup everyday. This will increase the protein content in our body and make us healthy and fit. Masoor dal will also help increase the digestion rate. Many Indian recipes are made using masoor dal.


viernes, 16 de marzo de 2012

I'm not including a picture because they're just that bad...

I came across Nigella Lawson's recipe for Apple Latkes and lo and behold I had all the ingredients on hand for breakfast the next day.

They were fairly fast to make and very very delicious - my bottomless pit of a child ate 4 of them!

I have no photos to show as all the ones I took were so bad I was ashamed.  And if you've seen some of the pictures I've posted over the years then you'll know just how bad they were.

Recipe: Apple Latkes

viernes, 9 de marzo de 2012

lunes, 5 de marzo de 2012

http://feedproxy.google.com/~r/blogspot/sBff/~3/yxzIPOxVwOg/spatchcocked-spatchcock.html

"Spatchcock" refers to the method of cutting open a whole chicken, so that it sits flat in a pan, or on a grill. However, it wasn't always the highly amusing verb it is today. 

Originally, it was a highly amusing noun used to describe a small, young chicken. Since these tender birds were usually butterflied to cook faster and more evenly over the coals, "spatchcock" became the culinary term for this technique. So, if you use a small, young chicken like I did, then you're actually spatchcocking a spatchcock, which is about the most entertaining answer ever to the question, "What are you doing for dinner?"

Above and beyond how fun it is to use in casual conversation, the technique really does work beautifully for grilling a whole chicken. Once you remove the backbone, and set free the sternum from its covering of cartilage, you'll have a bird that will cook quicker and more evenly. It also looks pretty damn cool.

If you don't own a sturdy pair of kitchen shears, then I hope this video inspires you to go out and get this must-have piece of equipment. They make this technique incredibly fast and easy, and you can also use them to completely section a whole chicken into serving pieces, as we showed in this video demo.

Anyway, I hope you pick up some spatchcock soon, and give this whole spatchcocking thing a try. I'll be showing a recipe I did using this technique in a future video, so stay tuned for that, and as always, enjoy!